Ionic Page Life Cycle
This guide covers how the page life cycle works in an app built with Ionic and Angular.

Angular Life Cycle Events
Ionic embraces the life cycle events provided by Angular. The two Angular events you will find using the most are:
| Event Name | Description |
|---|---|
ngOnInit | Fired once during component initialization. This event can be used to initialize local members and make calls into services that only need to be done once. |
ngOnDestroy | Fired right before Angular destroys the view. Useful for cleanup like unsubscribing from observables. |
For more info on the Angular Component Life Cycle events, visit their component lifecycle docs.
note
Components that use ion-nav or ion-router-outlet should not use the OnPush change detection strategy. Doing so will prevent lifecycle hooks such as ngOnInit from firing. Additionally, asynchronous state changes may not render properly.
Ionic Page Events
In addition to the Angular life cycle events, Ionic Angular provides a few additional events that you can use:
| Event Name | Description |
|---|---|
ionViewWillEnter | Fired when the component routing to is about to animate into view. |
ionViewDidEnter | Fired when the component routing to has finished animating. |
ionViewWillLeave | Fired when the component routing from is about to animate. |
ionViewDidLeave | Fired when the component routing to has finished animating. |
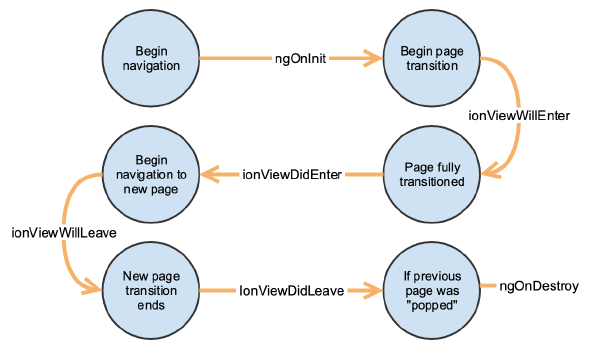
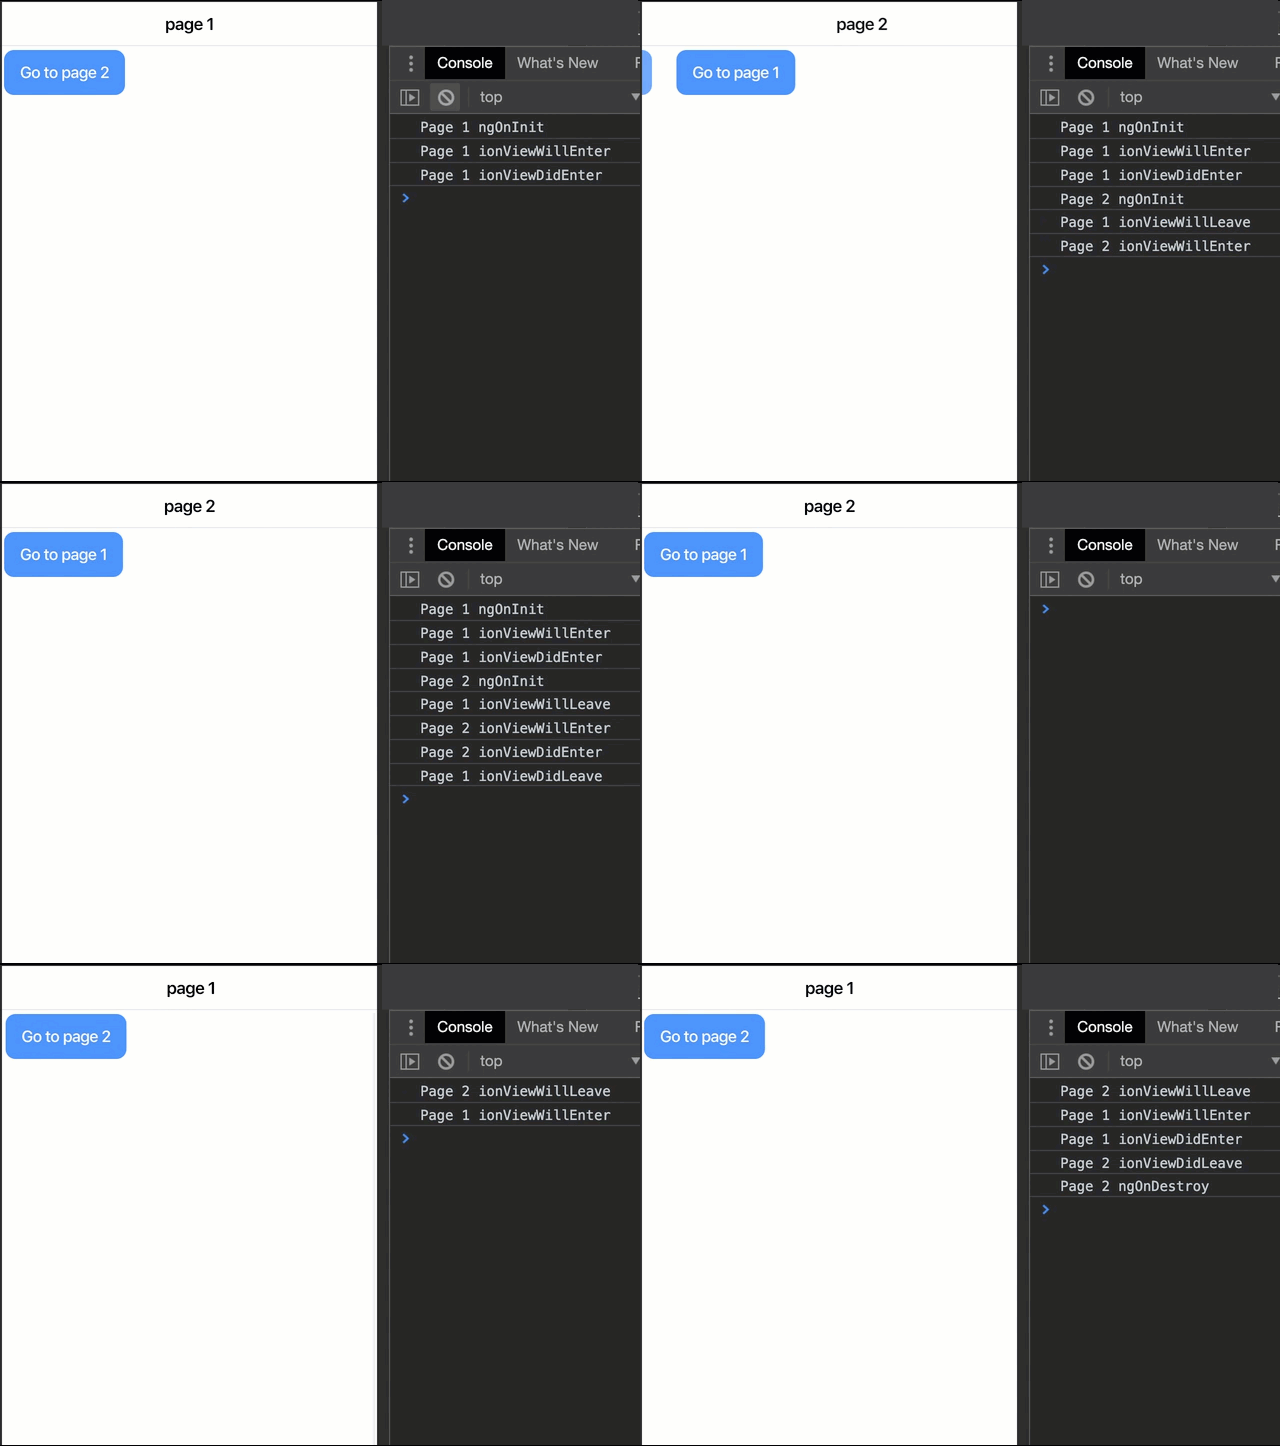
The difference between ionViewWillEnter and ionViewDidEnter is when they fire. The former fires right after ngOnInit but before the page transition begins, and the latter directly after the transition ends.
For ionViewWillLeave and ionViewDidLeave, ionViewWillLeave gets called directly before the transition away from the current page begins, and ionViewDidLeave does not get called until after the new page gets successfully transitioned into (after the new pages ionViewDidEnter fires).

How Ionic Handles the Life of a Page
Ionic has its router outlet, called <ion-router-outlet />. This outlet extends Angular's <router-outlet /> with some additional functionality to enable better experiences for mobile devices.
When an app is wrapped in <ion-router-outlet />, Ionic treats navigation a bit differently. When you navigate to a new page, Ionic will keep the old page in the existing DOM, but hide it from your view and transition the new page. The reason we do this is two-fold:
- We can maintain the state of the old page (data on the screen, scroll position, etc..)
- We can provide a smoother transition back to the page since it is already there and doesn't need to be recreated.
Pages are only removed from the DOM when they are "popped", for instance, by pressing the back button in the UI or the browsers back button.
Because of this special handling, the ngOnInit and ngOnDestroy methods might not fire when you would usually think they should.
ngOnInit will only fire each time the page is freshly created, but not when navigated back to the page. For instance, navigating between each page in a tabs interface will only call each page's ngOnInit method once, but not on subsequent visits. ngOnDestroy will only fire when a page "popped".
Route Guards
In Ionic 3, there were a couple of additional life cycle methods that were useful to control when a page could be entered (ionViewCanEnter) and left (ionViewCanLeave). These could be used to protect pages from unauthorized users and to keep a user on a page when you don't want them to leave (like during a form fill).
These methods were removed in Ionic 4 in favor of using Angular's Route Guards.
A route guard helps determine if a particular action can be taken against a route. They are classes that implement a certain interface. The CanActivate and CanDeactivate interfaces can be used to implement the same type of logic that the removed events ionViewCanEnter and ionViewCanLeave did.
@Injectable()
export class AuthGuard implements CanActivate {
  constructor(private authService: AuthService) {}

  canActivate(route: ActivatedRouteSnapshot, state: RouterStateSnapshot) {
    return this.authService.isAuthenticated();
  }
}
To use this guard, add it to the appropriate param in the route definition:
{ path: 'settings', canActivate: [AuthGuard], loadChildren: '...', }
For more info on how to use route guards, go to Angular's router documentation.
Guidance for Each Life Cycle Method
Below are some tips on uses cases for each of the life cycle events.
ngOnInit- Initialize your component and load data from services that don't need refreshing on each subsequent visit.ionViewWillEnter- SinceionViewWillEnteris called every time the view is navigated to (regardless if initialized or not), it's a good method to load data from services. However, if your data comes back during the animation, it can start lots of DOM manipulation, which can cause some janky animations.ionViewDidEnter- If you see performance problems from usingionViewWillEnterwhen loading data, you can do your data calls inionViewDidEnterinstead. This event won't fire until after the page is visible by the user, however, so you might want to use either a loading indicator or a skeleton screen, so content doesn't flash in un-naturally after the transition is complete.ionViewWillLeave- Can be used for cleanup, like unsubscribing from observables. SincengOnDestroymight not fire when you navigate from the current page, put your cleanup code here if you don't want it active while the screen is not in view.ionViewDidLeave- When this event fires, you know the new page has fully transitioned in, so any logic you might not normally do when the view is visible can go here.ngOnDestroy- Cleanup logic for your pages that you don't want to clean up inionViewWillLeave.